How to Fix a Hole on a Fiberglass Boat – Complete DIY Guide
Nothing can sink a boat faster than a hole, and even the smallest hole could sink a ship. This is hopefully not something every boat owner will need to worry about, but it is a good idea to know how to fix a hole on a boat just in case the unthinkable ever happens to you. If your boat springs a leak, you should take it out of the water right away and get it repaired before going back out.
This past summer I was having coffee with a friend I hadn’t seen since I was young, and I told him how I bought my first boat recently. He started to tell me a story that has been stuck in my head ever since he told it to me. He told me how a few summers ago his family rented a cottage with friends of his, and the cottage came with access to a boat down at the dock. One of the teenage boys in the group had taken the boat out and must have hit a rock or something, because the next day when they all went back down to the dock, there was about 8 inches of water in the boat. When the owner showed up he took the boat out of the water and pointed out stretches and a crack in the bottom left side of the hull. Needless to say, that man will probably never include his boat for strangers to use again.
How Much Does Fiberglass Repair Cost?
The cost to repair fiberglass and gelcoat will vary depending on how much damage is done. Typically this cost could range from $75 to $125, per hour in most places. Again depending on how severe the damage is, this could take anywhere from a few hours, to several hours. For example, chips and gouges can take a few hours, while an actual hole could take five to ten hours.
You can choose to repair the damage yourself, and in most cases, it’s a fairly easy, straightforward procedure. If you have all of the tools needed, you could probably fix the repair for about $30 – $60 depending on how severe the damage is.
Fiberglass Boat Repair Kit
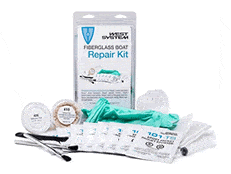 If your fiberglass repair is not too big, you can get away with buying a repair kit to fix the problem yourself. There is a fiberglass repair kit on Amazon called West System 105-K Fiberglass Boat Repair Kit that is great for repairing cracks, scraps, gelcoat blisters, loose hardware, damaged keels and smaller holes under 1″ in diameter. The package comes with everything you will need to perform the repair, as well as detailed instructions on how to use the product.
Currently, Amazon is selling this repair kit for $34.26 as of the time I am writing this. Click here to check the current price.
What is Gelcoat For Boats?
The gelcoat on a boat is the outer surface layer on a fiberglass boat hull, which is designed to protect the bottom layers of fiberglass, and give your boat that color and shine finish. The gelcoat is made up of special polyester resin and fiberglass, or epoxy resin which is typically used with carbon fiber for extra strength and water-resistance.
Just like any other finish, gelcoat is prone to scratches, chips, and deterioration. You might notice that over time your gelcoat might start to show ‘spider web’ looking cracks which would indicate a weakness in the underlying fiberglass. Another problem you might notice with the gelcoat is blistering, which generally means that there is a water intrusion under the gelcoat itself.
Most of the time the repairs to gelcoat scratches, cracks, and chips are a pretty straightforward repair that can generally be fixed using a gelcoat paste. It’s an easy job that can be performed by almost anyone, and really only requires a repair kit. The trickiest part is the sanding and polishing that’s required to blend the area with the hull.
How Do You Get Scratches Out of Gelcoat?
If your scratches are on the surface of the gelcoat, then those can be buffed out using a polishing compound, but if the scratches are deep they’ll need to be filled in. Normally if the surrounding gelcoat is in good condition, you can use a gelcoat paste to fill in the scratches. Because the surface of the cured gelcoat paste will be uneven, you will need to sand and polish the repair area.
What you will need:
First, you are going to need a gelcoat paste that can be picked up in a repair kit for less than $35. The kit should come with the gelcoat paste and hardener, selection of pigments, mixing sticks, and sealing film. You will also need to buy a single sheet of 150-, 220-, 400-, and 600-grit wet-or-dry sandpaper, and a flexible plastic spreader if you don’t already have one.
Matching the color:
Matching the color is going to be the toughest part of the repair. Many experts can tell you that it’s very difficult to perfectly match the color on a boat that’s been in the sun for a few years. White is typically a little easier to try matching, it’s more different when you start to get into colored hulls.
You can get a color-sample card from your local paint supply store that best matches your hull. Once you know which color-sample best matches, you can then ask the store clerk for the color formula used to create this specific color blend. With that information, you can then try to recreate the same color combination using the tints that came in your repair kit.
Prepare the scratch:
Before you start to apply the gelcoat paste to the scratch, take a screwdriver and run it down the scratch to open it up a little wider into a V shape. The reason for this is because the gelcoat paste is very thin and if it’s applied over the scratch then it’ll just end up forming a bridge over the scratch leaving a void under the newly applied gelcoat paste.
Apply Hardener:
To apply the hardener, make sure to read and follow the manufacturer’s instructions. Typically as a general rule, four drops of hardener will catalyze one ounce of resin at one percent. It’s better to add too little than too much hardener. The mix shouldn’t start to harden in less than 30 minutes. Hardening should take about two hours.
Apply the gelcoat paste:
Using a flexible plastic spreader, begin to work the gelcoat paste into the scratch. While applying the gelcoat paste, keep in mind that polyester resin will shrink slightly as it cures, so you’ll want to have the paste stick out a little from within the scratch. Remember you will be sanding this once it’s cured so it’ll be okay to put a little extra on. Don’t put too much extra, because that’ll create extra work for you when sanding.
Cover the repair area:
Gelcoat does not fully cure unless it’s covered up with a plastic sheet. Your repair kit might have come with a plastic film that you’ll have to use to cover the repair area. If you didn’t receive a plastic film with the repair kit, you can use some Saran Wrap or a plastic sandwich bag. First start by taping one side down to the surface just beside the repair, then smooth out the plastic onto the gelcoat and tape down the remaining sides. Let the plastic sit for at least 24 hours.
Sanding and polishing:
Once you’ve waited over 24 hours, you can remove the tape and plastic. Using a sanding block and a sheet of 150-grit sandpaper, begin to sand out the new section of gelcoat. For this, you’ll want to take your time and make sure you are only sanding the new patch of gelcoat and not the old surrounding gelcoat surfaces. Using a sanding block will help you keep the sanding confined to the repair area.
Once the new gelcoat has been sanded down and it’s now flush, switch to 220-grit wet-or-dry sandpaper. Continue to wet sand the repair, keeping your sanding block flat the whole time. For this, you are going to have to keep a slow drizzle of water running on the sanding area, while you sand the repair in a circular motion. Every so often, stop sanding and take your finger and run it over the repair area feeling for the ridge. Stop sanding when you can no longer feel a surrounding ridge.
Without using the sanding block anymore, switch over to a 400-grit wet-or-dry paper. Begin to sand the repair some more using water, until the repair area has a uniform appearance. Switch to a 600-grit wet-or-dry paper and continue sanding with water trickling over the repair for just a little longer.
Dry the water off using a soft cloth. Use a rubbing compound to help give the gelcoat a nice high gloss look. Apply the compound over a soft cloth, and begin to buff it over the surface of the repair area with a circular motion, first by using heavy pressure, then gradually reducing the pressure until the surface becomes glassy looking. If you are still able to see swirl marks in the gelcoat, continue to buff them out using a very fine finishing compound.
Finishing touch:
Once you have finished buffing out the last of the swirl marks in the gelcoat, you can now give the area a waxing. If you were able to match up the color properly, then once you are finished, the repair area should be hard to detect.
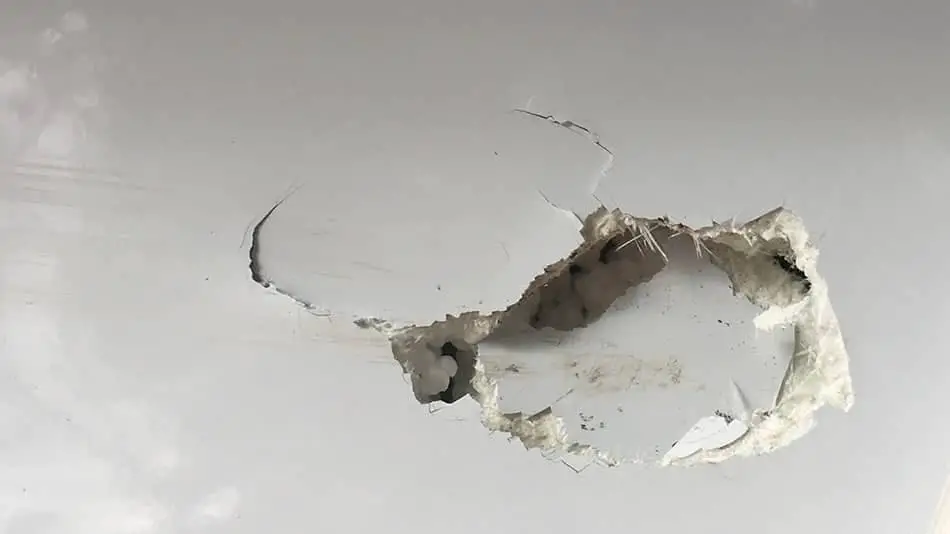
Repair small hole in a fiberglass boat hull
Hole going right through fiberglass into the boat:
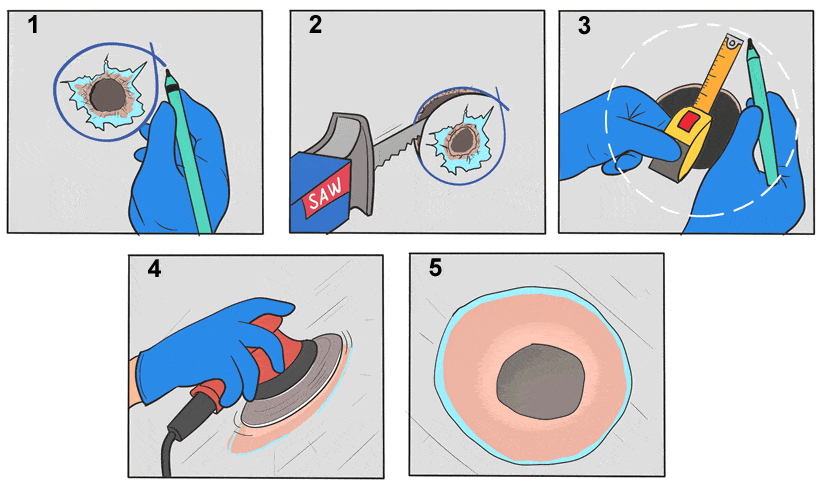
- First, examine the hole and look for cracks and chips extending out from the hole. Use a marker to circle the entire damaged area. Making sure to include the cracked spots.
- Next, take a saw and cut out the damaged area that you’ve circled with the marker.
- Now that the holes cut out, you need to determine the thickness of the hull substrate and multiply that by 10. This will give you a circumference around the hole that you’ll need to bevel down. Take a measuring tape and marker to outline that distance around the hole.
- Using a power sander with a 50 grit sanding disc, you can now bevel the whole edge out to your mark.
- Once you’ve finished bevelling the area, you now need to find something to go in behind the hole to block it. Some people use Ducktape for this or a piece of wood with plastic wrap over it.
You can now follow the steps below starting on #4 to patch up the hole.
Cracked couple layers of fiberglass, not quite through into the boat:
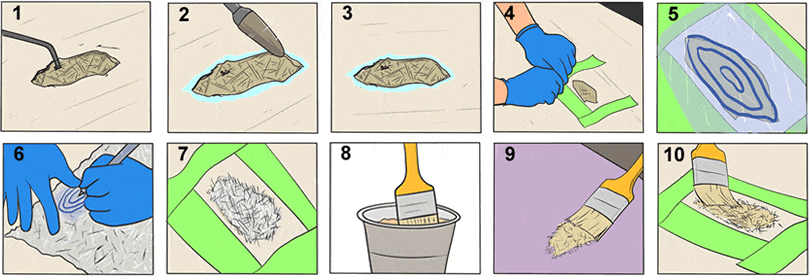
- Chip away any loose fiberglass from around the hole.
- Next, take a small grinder and smoothen the edges of the hole, as well as the exposed fiberglass.
- After you’ve ground the area, you should now be down to the solid laminate.
- Using a painters tape, place the tape around the hole to avoid getting access resin on other parts of the hull.
- Take a clear piece of plastic and place it over the hole. Now using a marker, trace around the edges of the hole. Next, come in a little from the edge and trace the outline out again. Finally once again, within that outline, coming in a little more, trace around the hole one more time. You should have 3 outlines of the hole, that will look like the rings on a tree stump.
- Next, cut out the larger outline first, and than trace that onto the new sheet of fiberglass. Once you’ve cut the fiberglass out, cut the next size outline out of the plastic and trace that on the fiberglass. Do this until you have all 3 outlines of the fiberglass cut out.
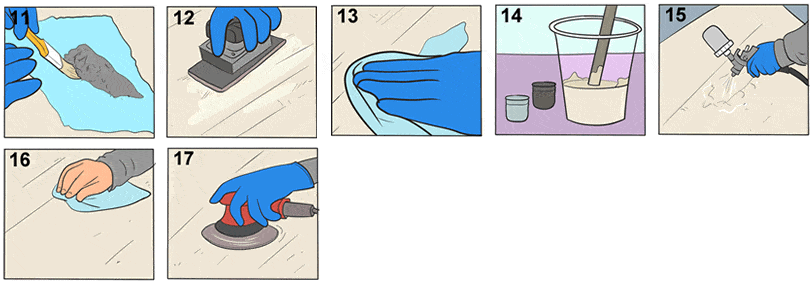
- Stack the pieces in the void that you ground out on the hull (putting the smallest size down first and working up) and check if the height will be good, or if you need to add one more layer. Most of the time you can get away with 3 layers, but adding an additional layer wouldn’t hurt. It would just mean extra sanding if it was too high.
- Next, mix up the vinyl ester resin and hardener in a small plastic container. Mix it up really good.
- Take a paintbrush and carefully wet each piece, front, and back.
- Take the pieces, one at a time and place them in the void. Start with the smallest size first and working up. Using your paintbrush, carefully spread them out getting rid of any air pockets or wrinkles caused by placing them down.
- After the last piece is added, remove the surrounding tape, then take some peel ply and place it over the repair. Using your paintbrush, carefully dab it around the peel ply and spread it out. Then let it sit for about an hour.
- After an hour, you can then take a sander and slowly sand the area smooth.
- Once you’ve finished sanding the repair, clean the area with some acetone.
- This is where things get a little tricky. Mix up a batch of gel coat, trying to match the existing hull color.
- Once you think you have the same color, it’s time to apply the paint to the repair spot. Using a spray nozzle is easiest.
- Once the gel coat is hardened, take some acetone and wipe the area clean.
- Finally, perform some wet sanding to the area to help transition the repair to the rest of the hull and give it that natural look.